Integrating Hydronic Heating Into Timber-Frame Construction
Key Highlights
- Coordinate hydronic system design early in the schematic phase to align with timber framing, structural elements, and architectural features
- Follow engineered hole charts and limit penetrations near load-bearing members to preserve structural integrity and aesthetics
- Implement expansion loops and humidity control measures to accommodate wood movement and prevent system stress or damage
- Plan manifold placement and zoning carefully to maintain visual appeal while ensuring even heat distribution in open-concept spaces
Contractors who want to integrate hydronic heating into timber-frame construction should be aware that these projects demand more front-end coordination than a typical stick-built project. However, the payoff is a quiet, even, high-comfort system that matches the premium aesthetics of exposed wood structures. When contractors plan for cross-linked polyethylene (PEX) routing, structural constraints, and thermal movement together with the frame and floor system, they can deliver systems that perform flawlessly without compromising the look or integrity of the timber frame.
Why Timber Frames Change the Game
Timber-frame construction puts gravity and lateral loads into fewer, larger members. It relies on exposed beams and open spans as defining architectural features. That differs from conventional wood framing, which distributes loads across many repetitive members, burying most of the structure behind finishes.
Hydronic systems in timber-frame homes often serve large volumes, tall ceilings, and extensive glazing, making radiant floors or panels a natural fit for comfort and efficiency. At the same time, those big timbers and long spans reduce framing “real estate” for mechanicals and increase the risk that a poorly drilled hole or poorly placed manifold will be visible forever.
Plan Hydronics Alongside the Frame
Start hydronic designs for a timber frame during the schematic layout, prior to submitting the drawings to an architect or structural engineer for the stamp.
Coordinating the design early allows the mechanical designer and timber framer to align post locations, bay spacing, stair openings, and chase locations with manifold placement, tube routing, and zone breaks.
At a minimum, a contractor should request:
- Reflected ceiling and framing plans that show beam sizes, directions, and bearing points
- Flooring details, including any structural insulated panels (SIPs), nail-base panels, or overbuild subfloor packages that will receive radiant tubing
- Proposed furniture layouts and traffic patterns to help refine radiant zoning and surface temperature expectations in large open rooms
Coordinating these pieces early also makes it easy to incorporate neutral language references to resources like timber frame home floor plans without being locked into one specific design.
Routing PEX Through Big Timbers and Heavy Floors
Running PEX through a timber frame is a lot different than drilling standard joists. The stakes are higher because each timber carries more load, and many connections remain exposed. Structural engineers and timber framers typically impose strict limits on hole size and placement, especially near bearing points and joinery.
Some things you should consider include:
- Avoid drilling primary frame members whenever possible. Instead, route supply and return mains through framed service chases, partition walls, or dropped ceilings
- Where structural designs allow for drilling, follow engineered hole charts and keep penetrations in the middle third of the member depth and clear of mortise-and-tenon joinery or steel knife plates
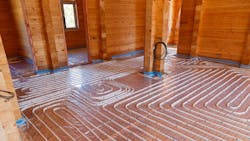
- In wood-framed radiant floors, consistently space tubes and carefully plan staple-up or panel layouts to maintain coverage without forcing tubing into structurally sensitive locations
In some projects, a hybrid floor build-up above structural decking, such as grooved panels or over-pour systems, allows tubing to sit in a sacrificial layer, leaving heavy timber or SIP structure intact. That approach can simplify drilling patterns and help when coordinating with hardwood flooring installers.
Managing Thermal Expansion in Wood Structures
Hydronic systems change temperature daily and seasonally, and timber structures change dimensionally with both moisture and temperature; thus, expansion management must account for both systems. Uncontrolled expansion and contraction of materials can cause issues such as squeaks, seasonal gaps, loosened fasteners, and stress in tubing at penetrations.
Key tactics include:
- Use appropriate expansion loops or offsets whenever PEX goes through tight holes in thick members or passes between conditioned and less-conditioned spaces
- Keep operating temperatures within the manufacturer and flooring limits. Lower-temperature radiant designs with good output area reduce stress on the tubing and wood
- Coordinate humidity control with the HVAC designer so interior relative humidity stays in the range recommended for timber and finished flooring, which minimizes seasonal movement
When installing radiant floors under hardwood, allow the flooring to acclimate and then bring the system up to temperature gradually on a reset curve to help avoid rapid expansion or cupping.
Contractors need to document operating limits for the owners and set control lockouts to prevent damaging thermostat overrides.
Working With Open Concepts and Exposed Aesthetics
Timber-frame homes often have an open-concept layout, cathedral ceilings, and a lot of glass, all of which affect radiant performance. Large spaces, such as those with cathedral ceilings, increase heat demand and can change stratification patterns, while window walls can create localized loads that challenge uniform floor temperatures.
Hydronic pros can use:
- Thoughtful zoning in individual rooms or functional areas, as seen in large farmhouse and custom-home case studies, where nearly every major space receives its own thermostat
- Manifold locations, accessible yet visually unobtrusive, tucked into closets, mudrooms, or mechanical cabinets and align them with post bays so short branch runs serve adjacent rooms cleanly
- Supplemental emitters in areas that require more load, such as radiant walls or panel radiators near large glass areas, to maintain comfort without driving floor surface temperatures beyond the limits wood will handle
Because beams and ceilings remain exposed, surface-mounted distribution is rarely acceptable. Careful pre-planning of chases and wall cavities preserves the clean timber aesthetic while giving hydronic piping the space it needs.
Protecting Finish Quality During Rough-In
Timber-frame projects often involve high-end finishes, from wide-plank hardwood to custom stone, which makes damage during rough-in costly. Hydronic contractors need to treat the structure more like a finished cabinet than a conventional shell once timbers and interior decking are in place.
They should:
- Use tubing layout drawings and printed panel systems or templates to minimize guesswork during fastening
- Mark tubing paths near the future fastening zones and advise contractors or installers of nail and/or screw limits to avoid punctures
- Protect exposed posts, beams, and subfloors at work areas with padding and clean drop cloths
- Coordinate drilling and manifold work to minimize repeated setup in finished spaces
Pressure testing before you cover any tubing is essential, but you should also synchronize the testing schedule with contractors and subcontractors to find leaks prior to the finish work, as it makes it difficult to access the tubing.
Long-Term Performance
Once contractors install the system in a timber-frame home, they should confirm hydronic performance and that wood movement and finishes stay within expectations through the initial heat-up.
Slow ramp-up, careful observation of flooring and trim, and verification of zone balance are essential steps.
Contractors should:
- Verify design flows, delta-Ts, and surface temperatures in representative zones, huge great rooms and high-glass areas
- Review controls with the owner and builder, emphasizing temperature limits, humidity control, and seasonal adjustments that keep both the system and structure in their comfort zone
A short follow-up visit can catch minor issues, such as air pockets, noisy components, or unexpected cold spots, before they become callbacks in a complex, high-visibility project.
Deliver Quiet, Reliable Radiant Systems
Timber-frame construction raises the bar for hydronic installations because structure, systems, and aesthetics are all on display. When contractors plan PEX routing, expansion management, and zoning with the timber frame and floor assemblies, they can deliver quiet, durable radiant systems that feel as good as these homes look.
To learn more about the advantages of timber frame construction, visit www.riverbendtf.com/blog/timber-framing-advantages.
SOURCES
www.jlconline.com/how-to/hvac/hydronic-radiant-heat-for-wood-framed-floors_o
www.floortrendsmag.com/articles/112384-case-study-a-radiant-heat-system-warms-custom-modern-farmhouse
wbiwarm.com/installing-nailed-hardwood-over-radiant-heating-panels/
www.rejuvenationfd.com/blog/hydronic-radiant-floor-heating
www.watts.com/resources/case-studies/modern-architecture-meets-radiant-heating
About the Author
Matt Franklin
Matt Franklin is the Lead Architect at Riverbend Timber Framing, which produces beautiful, energy-efficient timber frame homes across North America. With 30 years of experience designing the finest custom timber homes, Matt brings deep expertise and a passion for creating homes that reflect both the land and the lifestyle of each client. His thoughtful approach has helped his homes win nearly 100 national design awards.