Pinpoint the Slab Leak Before You Break the Floor
Key Highlights
- Start with simple checks like water meter tests and visual inspections to confirm the presence of a slab leak before proceeding
- Use hot vs. cold line isolation and pressure testing to narrow down the leak's location within the plumbing system
- Always scan for rebar, tendons, and conduit before cutting into the slab to avoid structural damage and costly mistakes
- Choose the repair approach based on leak severity, pipe condition, and customer needs, balancing quick fixes with long-term solutions
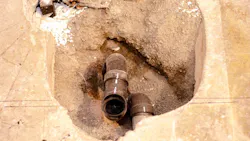
The cost of a slab leak is rarely the pipe. It is the concrete you open, the finished floor you cut through and the hours you spend chasing a leak you have not actually located. A confident location shrinks all three. The goal on every slab job is the same: confirm it is a slab leak, isolate it to one line, pinpoint it to a spot you can mark, and only then decide how to get to it.
Here is the sequence we run in the field, and the judgment calls at each step.
First, Confirm it is a Slab Leak
Plenty of calls that come in as slab leaks are not. Before anyone reaches for a listening disc, rule out the cheap explanations: a running toilet, an irrigation zone, a hose bib, a water heater weeping at the base, or an AC condensate line. A quick walk of the property and a look at the water heater and manifold saves an hour of chasing the wrong thing.
The meter test tells you whether water is moving at all. Shut every fixture and appliance that uses water, then watch the meter's low-flow indicator, the small triangle or sweep hand that turns on even the slowest flow. If it keeps creeping with everything off, water is escaping somewhere in the pressurized system. If the house has a separate irrigation tie-in, isolate it first so the yard does not read as a slab leak.
Warm spots on the floor, a faint sound of running water with the house quiet, an unexplained jump in the water bill and soft pressure at the fixtures all point the same direction. Note them, but confirm with the meter before you commit.
Isolate the Line Before you Pinpoint the Spot
Pinpointing is far easier when you have already narrowed the leak to one side of the system. Start with hot versus cold. Close the cold-water inlet valve at the water heater. If the meter's leak indicator stops, the leak is on the hot side downstream of the heater. If it keeps moving, the leak is on the cold side. That one valve cuts your search area roughly in half.
From there, a pressure test separates a supply leak from a drain problem and isolates the branch. Cap the section, put a gauge on a hose bib or a laundry connection, bring the isolated line up to pressure with air or water and watch for a drop. A pressurized supply line that will not hold has an active leak. A line that holds sends you to the drains, where a hydrostatic test and a camera are the right tools instead. In a home plumbed with a PEX home-run manifold, you have an advantage: cap and pressurize one line at a time off the manifold and let the gauges tell you which run is failing.
Do not skip this stage to save time. Every minute spent isolating is a minute you are not sweeping the whole slab with a microphone.
Pinpoint with Two Methods, Not One
No single detection method is right for every leak, so we confirm with a second before marking a spot.
Acoustic detection is the workhorse. A ground microphone or listening disc picks up the hiss of water escaping under pressure. Higher line pressure makes the signal louder, so pressurize the isolated line first, then sweep a grid across the suspected zone and mark the loudest point. Hard flooring transmits sound well; carpet and thick pad fight you.
Tracer gas shines where acoustic struggles, on plastic lines and low-pressure situations. Drain and isolate the line, charge it with a non-flammable forming gas (typically a 5% hydrogen and 95% nitrogen mix) and let the small gas molecules migrate up through the slab. A gas-sensitive detector at the surface finds where they surface. It is slower to set up but hard to argue with.
Thermal imaging is a fast way to narrow the zone on a hot-side leak. A warm plume spreads on the floor above the escaping hot water and shows up on the camera long before you would hear it. Use it to shrink the search area, then let acoustic or tracer gas fix the exact spot. Cold-side leaks give a weaker thermal signature, so do not rely on the camera alone.
Line tracing is the step crews skip and regret. Trace the actual route of the pipe, do not trust the as-built drawing or a guess, so you know where the line really runs before you core. Pair it with a moisture map of the wet footprint. When a thermal plume, an acoustic peak and the known pipe route all agree, you cut once.
Scan Before You Cut
In much of Florida, slab-on-grade construction can be post-tensioned, and a post-tension tendon is not something you want to hit with a core bit or a jackhammer. Before you open any slab, scan for tendons, rebar and conduit with ground-penetrating radar or a rebar locator and mark them clearly. Know the era and method of the construction you are working on. This one habit separates a clean repair from a dangerous and expensive mistake.
Then protect the space: contain the dust, cover the finishes and set expectations with the homeowner about what the floor will look like before it looks better.
Choosing How to Get to It
Locating the leak is only half the job. How you reach it is where technical judgment turns into a business decision, and it is worth walking the customer through the options rather than defaulting to the fastest one.
A spot repair, opening the slab at the pinpoint and fixing the single failure, is quickest and cheapest when the pipe is otherwise sound. But a pinhole in copper carrying aggressive water is often the first of several. If you have already been back to the same house for a second or third leak, or the water chemistry is hard on copper, a reroute overhead or through the walls, or a full repipe, saves everyone the cycle of chasing pinholes through the floor one at a time. Weigh the finished-floor restoration cost, the occupant disruption and the odds of the next leak. The right call protects the customer's floor and your reputation, not just today's ticket.
Close It Out
After the repair, bring the system back up to pressure and confirm the leak indicator sits still. Patch the slab properly, document what you found and where, and leave the customer with a clear picture of the line's condition. A leak located with confidence and a repair method chosen on the evidence is a job you will not be called back to.
Contributed by Dreamland Plumbing, a licensed plumbing contractor serving Florida's Treasure Coast, specializing in leak detection, water heater and emergency plumbing repair. Learn more at dreamlandplumbing.com.